
How to build a free Crypto Dashboard?
How to build a free Crypto Dashboard?


Hi there, ✋
I’m Miguel, living in Barcelona, and hopefully I can help you to build a simple, clear and automated dashboard that will help you track your gains on this new world that is Blockchain & Cryptocurrency. 💎🙌
Btw: Maybe you like to read weird stuff too. I have other small, quick to read, and curious posts on my profile that may interest you ➡️ Miguel Parente
Before diving into it, some important points to take into consideration:
You don’t need to be a programmer! For sure I’m not one, and with the big help of my friend André Pacheco (here) 🙏, we built it in a way that everyone can replicate and adapt to their needs.
It’s completely free! We used the CoinGecko(here) API, that allows you to have a huge amount of free calls to extract the data.
Also, there is no charge for copying the entire Google Sheet and start using it.
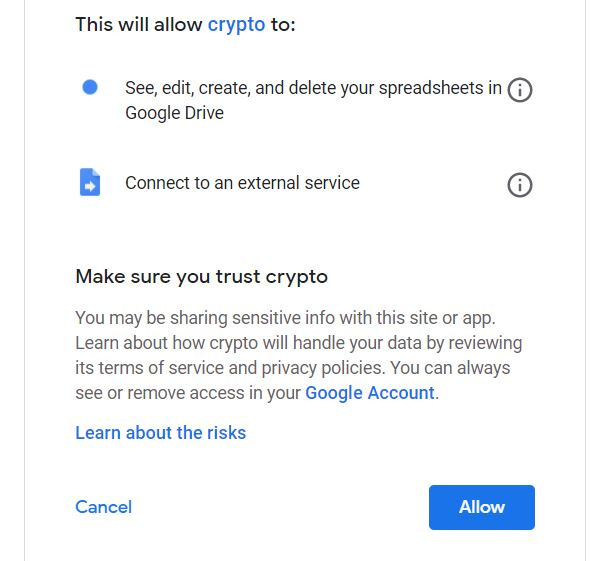
It’s safe and no one is going to have access to your personal data! When running the scripts and start the Google Sheet Dashboard, for safety reasons Google will notify you that you are reaching out for info that they cannot assure to be safe. This is the precaution safety protocol, and indeed the data you extract from CoinGecko(here) API is a safe one.
Also, if you replicate the Google Sheet Dashboard to a new Google Sheet of your own in your drive, you can make sure that no one has access to it (on the share button on the right up corner, you can confirm it).
And for last, this is a very simple and rookie Crypto Dashboard. So, if you are a tech savvy or a high frequency trader this is not what you are looking for.
With all of that out of the way, just let’s cut to the chase. ⛏️
📊 You can find the Google Sheet Dashboard — **Example** here:
https://docs.google.com/spreadsheets/d/1NTwgs2iUJq-fOzKrgLWNOiHiUI1BJpsaT9EeTlY9i68/edit?usp=sharingIf you want to start working on a Dashboard on your own, just go to “File” ➡ “Make a Copy”, and make sure you are not sharing it with anyone you don’t want (share button on the right up corner).
To properly activate the dashboard you need to give Google the consent to extract data (that’s why you see everything like #N/A). To give this consent, to google to go get / extract data from the API, you go to “Tools” ➡ “Script editor” and run the script “importJSON” and then accept the notification boxes that will appear.
What do we have in each tab sheet?
Brief explanation of the info that you may see on each Google Sheet tab and the purpose of it. But, feel completely free to start editing and better adapt to your needs.
Dashboard → the idea here is to quickly see the main KPIs regarding your portfolio. You can see a table with the current tokens that you have and their price and status. Also, boxes with the “overall return” by % and value on only the cypto sold or on the overall picture (sold + not sold). Then you have one line chart to track the evolution of your portfolio by market cap over time, and one pie graph to track the current % distribution on the different asset tokens.
ResumeCrypto → you can find a simple table with the following info on every token that you have purchased: “Symbol”, “Name”, “Amount”, “Price”, “Market Cap”, “Circulating Supply”, “Market Cap Change 24h”, “Price Change Percentage 24h”, “Max Supply”, “Market Value”.
Performance → you can find very similar info to the other sheets, and here you can see the calculations behind the current gains by token.
Transactions → this is an important one! Here is where you manually will add each new movement on your portfolio. It’s very intuitive and I left some examples for you to base on.
SummaryTrans → here we have a query that automatically gathers the info on “Transactions”, applies some calculations and then format it in a table. This table allows you to see the current token flow for each crypto. The query formula is on the cell (1,1):
=QUERY(Transactions!A:K,”Select C, SUM(I), SUM(J),SUM(K) WHERE C IS NOT NULL Group By C “)PortfolioTrend → you will better understand it further along in the article, because I will explain in detail the script behind this sheet. Here you will have the total value of your portfolio by day.
GetCoinData → it’s where we extract data on cryptos from the CoinGecko(here) API. Again further along in the article, I will better explain the script behind this sheet.
Coins → currently this sheet is not used for the Dashboard. I left it there as a precaution measure, in case the API does not work and you need to find another way to extract data on cryptos. Basically, you have the following formula on the cell (1,1):
=IMPORTHTML(“https://coinmarketcap.com/es/all/views/all/","table", 3)Note: If you purchase a new token, just make sure that most of the tables in all tabs have the formulas until the end of the table. The new token, should appear automatically and you just need to expand the formulas to its line.

What about the scripts?
We use just two scripts to automatically update the dashboard info, and you can find it in the menu “Tools” ➡ “Script editor”.
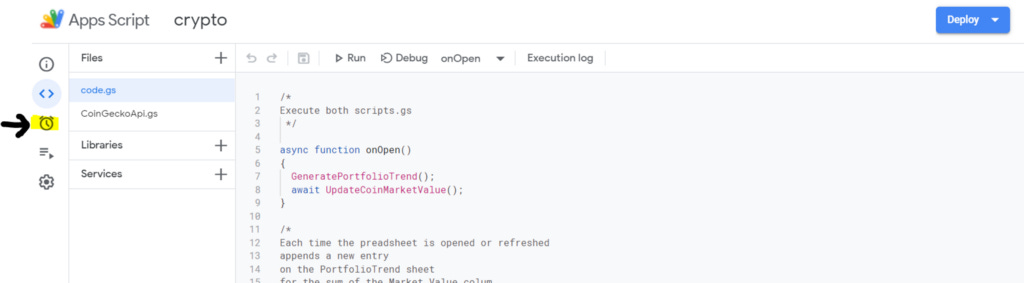
Script — code.gs:
The execution of this script will generate the new line of info on the tab sheet “PortfolioTrend” regarding the date and the portfolio value at that time stamp. By refreshing the Google Sheet, this script should execute autonomously.
/*
Execute both scripts.gs
 */

async function onOpen()
{
  GeneratePortfolioTrend();
  await UpdateCoinMarketValue();
}

/*
Each time the spreadsheet is opened or refreshed
appends a new entry
on the PortfolioTrend sheet
for the sum of the Market Value colum
from the ResumenCrypto sheet.
*/

function GeneratePortfolioTrend() {
   var spreadsheet = SpreadsheetApp.getActiveSpreadsheet();
   var performanceSheet = spreadsheet.getSheetByName('ResumeCrypto');
   var rng = performanceSheet.getRange(2,10,performanceSheet.getLastRow());
   var values = rng.getValues()
   var total = 0
   for (var i = 0; i < values.length; i++) {
     if (parseFloat(values[i]) > 0) {
       total = total + parseFloat(values[i]);
      }
     }

   var localDateTime = new Date ()
   var portfolioSheet = spreadsheet.getSheetByName('PortfolioTrend');
   portfolioSheet.appendRow([localDateTime, total]);
}

/*
Extract data from coingecko API
 */
async function UpdateCoinMarketValue() {
  var coinData = await GetCoinData();
  var spreadsheet = SpreadsheetApp.getActiveSpreadsheet();
  var performanceSheet = spreadsheet.getSheetByName('GetCoinData');
  var rng = performanceSheet.getRange(2,1,1500,9);
  rng.clearContent();
  rng.setValues(coinData);
}
Script — CoinGeckoApi:
The execution of this script will extract data from CoinGecko(here) API.
async function GetCoinData() {


/*
Extract data variables on each token
 */

  var propertiesToExport = ['market_cap_rank', 'name', 'symbol', 'market_cap', 'current_price', 'circulating_supply', 'market_cap_change_24h', 'price_change_percentage_24h', 'max_supply'];

  try {
    // /rates/EUR
    var coinsData = await GetAllPages();
    var accumulator = [];
    coinsData.forEach(function (coin) {
      var coinItem = [];

      propertiesToExport.forEach(function (prop) {
        if (prop in coin) {
          coinItem.push(coin[prop]);
        }
      })

      accumulator.push(coinItem);
    });

    return accumulator;
  }
  catch (err) {
    Logger.log(err);
    return "Ups! Something went wrong :(";
  }
}

/*
Extract data from coingecko API to a max of "6" pages and 250 tokens per page
 */

async function GetAllPages() {
  const logicAppUrl = 'https://prod-17.centralus.logic.azure.com:443/workflows/7192af624cf84e7aa8b8fa043964fe1b/triggers/manual/paths/invoke?api-version=2016-10-01&sp=%2Ftriggers%2Fmanual%2Frun&sv=1.0&sig=K_rfjIJqNKrd11xzfQc0jS9FrKjJIkrcL8HZ6n0Tqf0'
  const maxPageNumber = 6;
  var allCoinData = [];

  var url = 'https://api.coingecko.com/api/v3/coins/markets?vs_currency=eur&order=market_cap_desc&per_page=250&page=#pagetoreplace#&sparkline=false';
  try {
    for (var i = 1; i <= maxPageNumber; i++) {
      var urlToFetch = url.replace('#pagetoreplace#', i);

      var formData = {
        'Url': urlToFetch
      };

      var options = {
        'muteHttpExceptions': true,
        'method' : 'post',
        'payload' : JSON.stringify(formData),
        'contentType': 'application/json'
      };
      var res = await UrlFetchApp.fetch(logicAppUrl, options);
      Utilities.sleep(300);
      var content = res.getContentText();
      var coinsData = JSON.parse(content);

      allCoinData = allCoinData.concat(coinsData);
    }
    return allCoinData;
  }
  catch (err) {
    Logger.log(err);
    Logger.log('pagina ' + page);
    return "Ups! Something went wrong :(";
  }
}
Here you can have more fun with it and actually change / adapt some requests or fields on the code. 🤪
Also, they have it quite well explained on their Blog — API Docs (here).
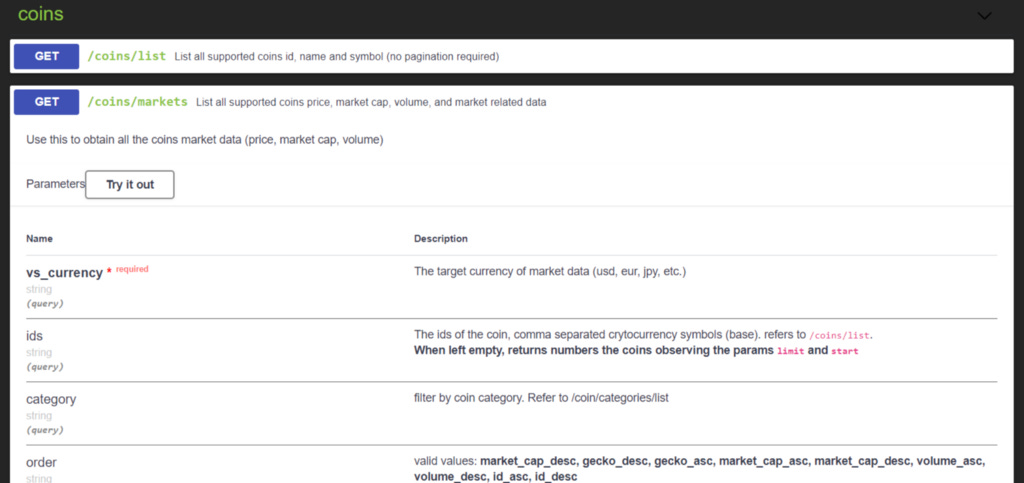
On the CoinGecko(here) API Doc, you can select the type of info that you are looking for:

We used /coins/markets and just give it a “try out”:
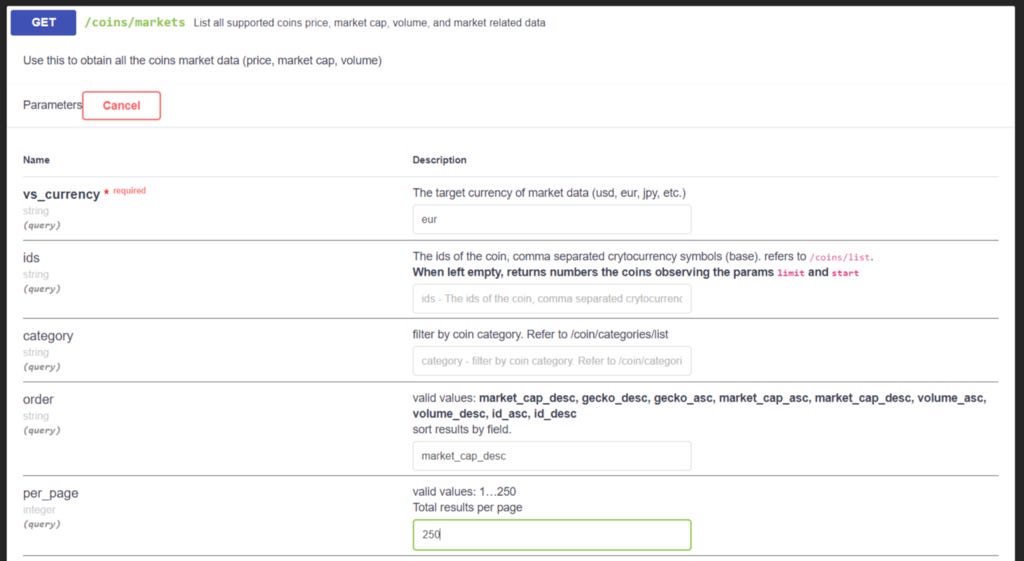
Adapt the parameters that you want:
And execute to have the final URL API version:
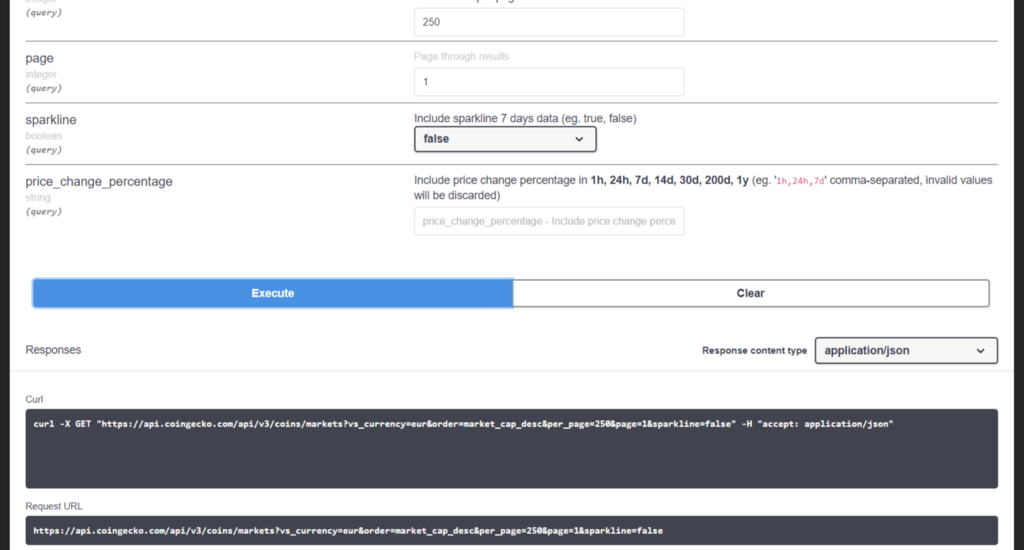
Once you execute, you can also see the data answer on the response from the URL:

All these parameters that you see, it’s what you can adapt on the script on the “propertiesToExport” part.
For example: if you want to add “ath” parameter to the info you extract, just add a line inside “var propertiesToExport” like ‘ath’:
(...)var propertiesToExport = ['market_cap_rank', 'name', 'symbol', 'market_cap', 'current_price', 'circulating_supply', 'market_cap_change_24h', 'price_change_percentage_24h', 'max_supply','ath'];try {
(...)If you want to extract other type of info, just “try out” another URL API call and change it on “var url =”, just be extra careful adding the customizable parameter #pagetoreplace# in the URL:
(...)
async function GetAllPages() {
const maxPageNumber = 6;var allCoinData = [];var url = 'https://api.coingecko.com/api/v3/coins/markets?vs_currency=eur&order=market_cap_desc&per_page=250&page=#pagetoreplace#&sparkline=false';try {
(...)If you really want to have some fun 🥳 you can also change the error message:
}catch (err) {return "Aliens are coming! And Elon Musk is not going to save you!";}}Note: be careful! If you change the names of the tab sheets some of the scripts or links may not work. Make sure you review if the tab sheet name is not present in any script and if it is, just changed it there as well.
It’s possible to automate the scripts?
Indeed, it is… thanks to the amazing Google Developers! You can create automated triggers that will follow your rulling to activate the functions () in the scripts.
In this case, it’s a best practise to create a trigger for the function GeneratePortfolioTrend():
In the menu “Tools” ➡ “Script editor”, select the “Trigger” button ⏰:
Here you can select “+ Add Trigger” button on the right down side (in my case I already have a trigger created, you should not have it yet):

It will appear a pop-up to create the trigger, where you can give the commands that you want:
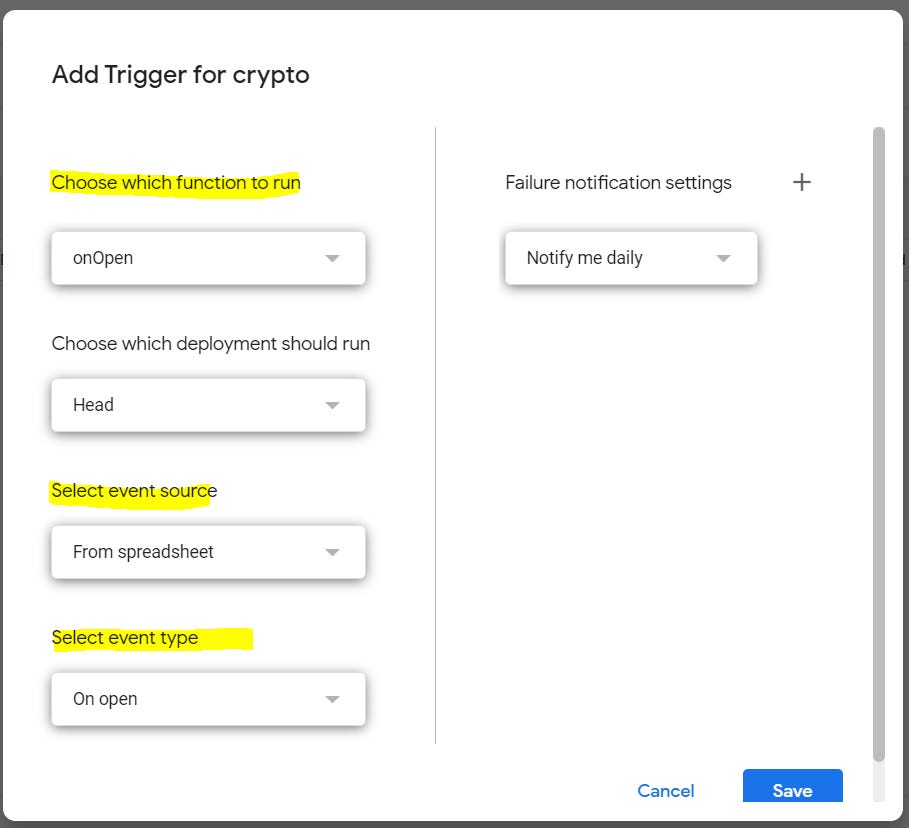
Select the fields in yellow and it will show a dropdown selection where you can change:
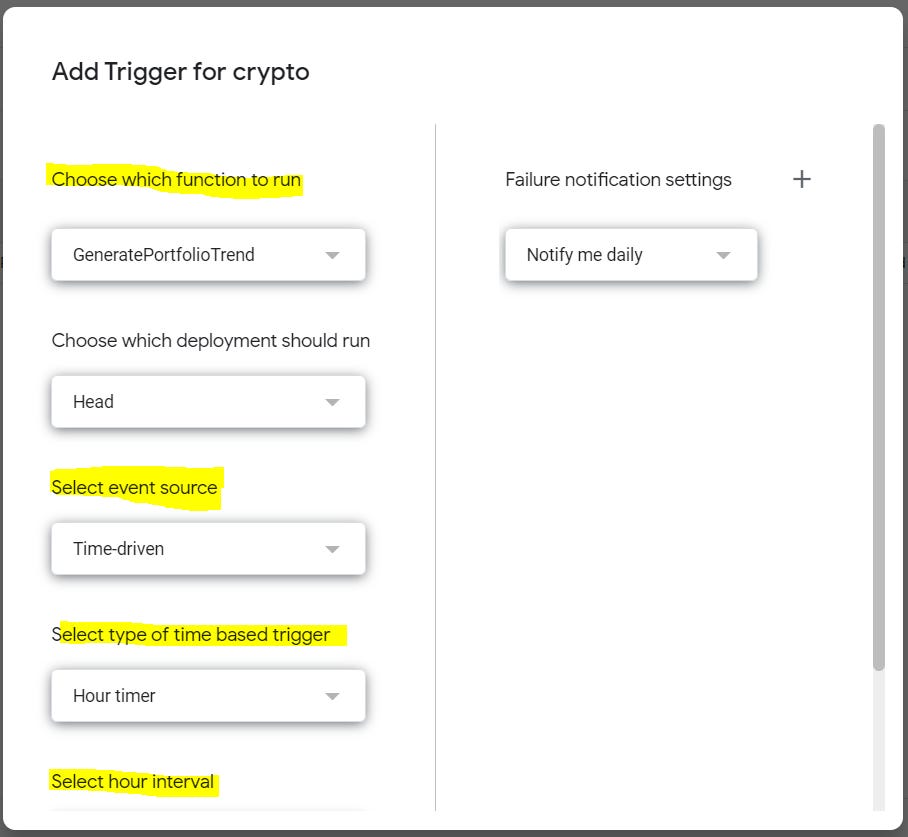
“Choose which function to run” ➡ GeneratePortfolioTrend
“Select event source” ➡ Time-drive
“Select type of time based trigger” ➡ Hour time
“Select hour interval” ➡ Every 6 hour
Then just select the button “save” and it will ask for your permissions again… and you are ready to go. 🚀
Happily ever after?
As you can see, it’s quite simple and straight forward. Before, building it, I also was looking into blogs and watching every YouTube video on the matter to understand where to start.
Hopefully, I did just that to you… help you to start! Now is on you to keep playing and improving it.
Thanks! ❤

IMPORTANT: most of the images I use are from Muzli, and are used without any monetization purpose.
Thanks again André Pacheco (here)!! 🙏😘